Categories
Calendars
Guides
Reviews
Archive
Gallery
Articles
Ask Our Gardening Expert
MORE COMPOST BINS (page 3)
More Types of Compost Bin
The type on the left comes in several colours including a good
shade of green to blend in with the background.
Good Plastic compost bin. A slightly 'up
market' plastic bin. It has a matching lid plus a hatch at the
bottom which can be opened up to remove compost with a spade.
No assembly is required at all (other than putting on the lid
of course!) and it's light and strong.
This speeds up the composting process from 10 months to just 14
days in warm conditions Some assembly
is required, but it's simple to do.
Click here
to buy this Compost Tumbler. Coarse ingredients include straw, egg shells,
shrub trimmings, larger weeds. Don't use meat or fat, too much wood ash, sawdust or
weeds in seed on the compost heap. Building the Layers of the Compost
Heap Start with a layer, about 5cm (2inches) deep, of grass
cuttings , then a layer of activator (manure, bone meal etc) then some
coarser material such as kitchen waste or larger weeds, the finish with
coarser material such as shrub cuttings or straw. Don't worry too much
about the sequence, the key is to alternate between finer materials, the
activator and the coarser material. Don't position the compost heap too near trees or
shrubs, the roots of these plants may surface and grow into the compost
heap. It is best however to put a layer of soil at the base of the
compost heap and ensure its level. When the Compost is Ready
In an ideal world, your compost will be ready about
three months after the heap has been completed. The compost material
will be crumbly and brown, damp but not wet. In a typical compost heap however, the quality may be
variable with some parts only half rotted. The probable reason is that
your compost heap is too small. The solution is to use the good parts of
the compost heap and use the rest to start of the next heap. Don't dig
only partially composted material into your soil. If you do this, the
texture of the soil will be improved, but as the material rots within
the soil, it will suck up all the nutrients. If you must use partially
composted material in the garden, use it as a mulch on the soil surface.
Digging the compost into plant/vegetable beds is the
best use of compost, because this will improve the soil texture and
provide a long-lasting supply of slow release nutrients. An alternative
is to use the compost as a mulch.
MORE COMPOST BINS
(page 3)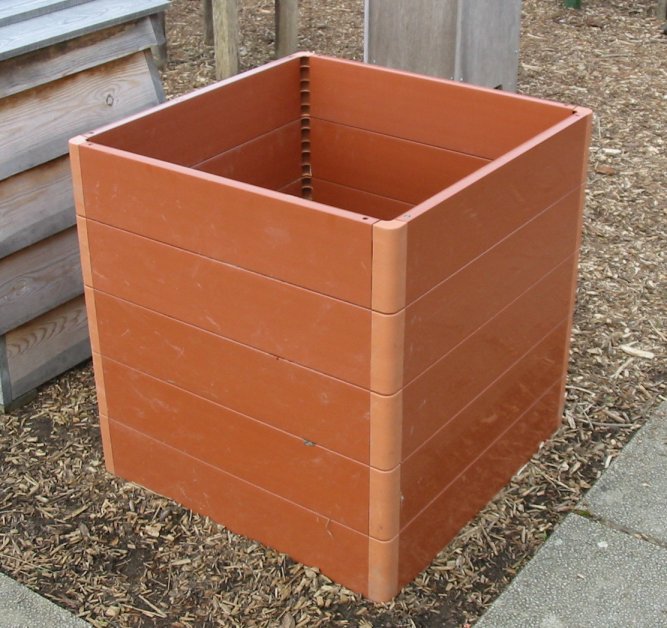 Basic Plastic compost bin. Light to move
around, simple to assemble and it will last indefinitely. This is
a great solution for small to medium sized gardens.
Basic Plastic compost bin. Light to move
around, simple to assemble and it will last indefinitely. This is
a great solution for small to medium sized gardens.
CLICK
PICTURE TO ENLARGE
CLICK PICTURE TO
ENLARGE
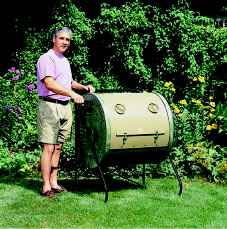 Compost Tumbler. One of the most
sophisticated types and the most expensive. Load up the compost
and daily rotate the cylinder to tumble up all the compost
ingredients.
Compost Tumbler. One of the most
sophisticated types and the most expensive. Load up the compost
and daily rotate the cylinder to tumble up all the compost
ingredients.
What Ingredients Are Best?
The first rule is to mix finer and coarser ingredients. All
of the ingredients below are good for the compost heap.
Intermediate ingredients include shredded newspaper, most kitchen
waste.
Finer ingredients include grass clippings, green leaves, small
weeds, tea leaves.
Activator ingredients are the various animal manure - horse, cow,
pig, chicken - almost all animal manure is suitable.