Categories
Calendars
Guides
Reviews
Archive
Gallery
Articles
Ask Our Gardening Expert
No Dig Gardening
A deeply cultivated and well tended vegetable garden needs a commitment to time and a certain effort. Many gardeners tend their plots over years and can look forward to planning for the future in the certainty that they will be there to benefit from their efforts.
We have an increasingly transient population, particularly young people, students and those whose work demands mobility, who enjoy the benefits of growing their own food and may have tight budgets.
A no dig vegetable bed is an easy and quick way to start growing vegetables and can be set up in an afternoon. The materials cost little and are easily available, there is plenty of room for individual creativity here. A minimum of tools are required for cultivation. Life in the underlying soil remains undisturbed and leaves weed seeds well below the surface where they are unable to germinate. Only a small space is needed and a medium size garden can provide the vegetable needs for a small group for a whole year. It is an excellent way of recycling what is normally waste material without needing a weekly collection.
Start by choosing a suitable site. Make a note of the available spaces around you. Remember that you are creating your own growing medium and the plot does not necessarily have to be sited on soil, bare concrete will do if there is no other space. View the site through the day to find out for how long it is exposed to full sun and where shadows are most likely to fall. Remember that in winter months, days are shorter and the sun is lower in the sky.
Layers in a no-dig garden bed
The width of the bed should be narrow enough to be able to reach the middle without stepping on the soil. Length is not as important but it is far better to start with one small bed and add more as required. Planting, harvesting and weed removal is much easier if all parts of the bed can be reached whilst sitting or kneeling at the edges.
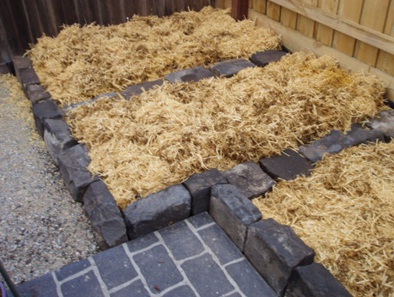
No dig gardens are ideal for an urban setting
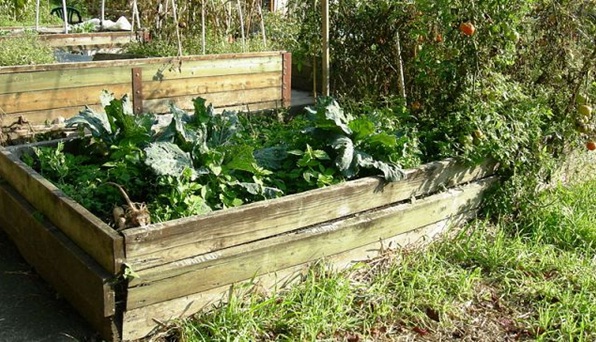
Sides are needed to retain the materials. Boards or concrete blocks can be used, anything strong enough to hold in the growing medium. Materials can be bought new or recycled. Scaffolding planks are ideal and have to be replaced after a time. Avoid treated timber but if no other is available, heavy polythene can be used to form a barrier between the soil and the timber.
Collect materials from recycling centres or even the dump
Although the bed can be assembled in a short time, planning helps and reduces costs. Seeds can be started early in containers so that plants are ready to be planted out soon after establishment. Build or buy a compost bin. Kitchen waste can be collected in advance and composted. It may be possible to ask neighbours or a garden contractor for their lawn clippings. Large amounts of shredded paper are thrown out from offices and this can be added to composted matter.
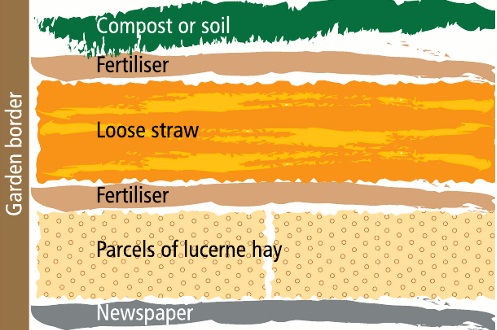
If the bed is to be sited on concrete or other hard surface, sticks or other course material should be laid down to allow drainage. Lay sheets of cardboard or newspaper to cover the base. This layer should be at least 5mm thick and all the edges should overlap. Next, spread a layer of or lucerne straw, followed by ordinary straw. Sprinkle some garden lime and blood and bone or equivalent organic fertiliser and water well. Add more layers if needed, when the straw compacts.
Before planting, tip some well rotted compost on to the straw. Carefully lift the plants from their containers, taking care to keep the root ball intact, move the compost aside to form a hole for the plant. Water well after planting and continue with regular watering. Liquid manure can be used to boost growth.
Follow the advice in other parts of this website for cropping suggestions, techniques and planting times.
As the plants grow, the straw and compost breaks down to form soil. Remembering that this is a ‘no-dig’ garden, the layers are to remain undisturbed and more straw and compost is added between crops. Weed seeds may be present in the straw and compost or are carried in by the wind. Should they germinate, they can be scuffed when they are small and left to add to the soil mix. Larger weeds can be easily pulled by hand, left to dry out on the surface and added to the compost bin.